Superpowers
I keep my agent skills and plugins minimal. This set of software development agent skills hits a sweet spot.
Bytes that get stuck in your teeth.
I keep my agent skills and plugins minimal. This set of software development agent skills hits a sweet spot.
Instapaper Team:
Our focus for PDFs is to make them more readable, especially on mobile devices, and bring the suite of Instapaper tools to PDFs including highlighting, notes, text-to-speech, etc.
Maybe now I’ll make a dent in my folder of unread PDFs.
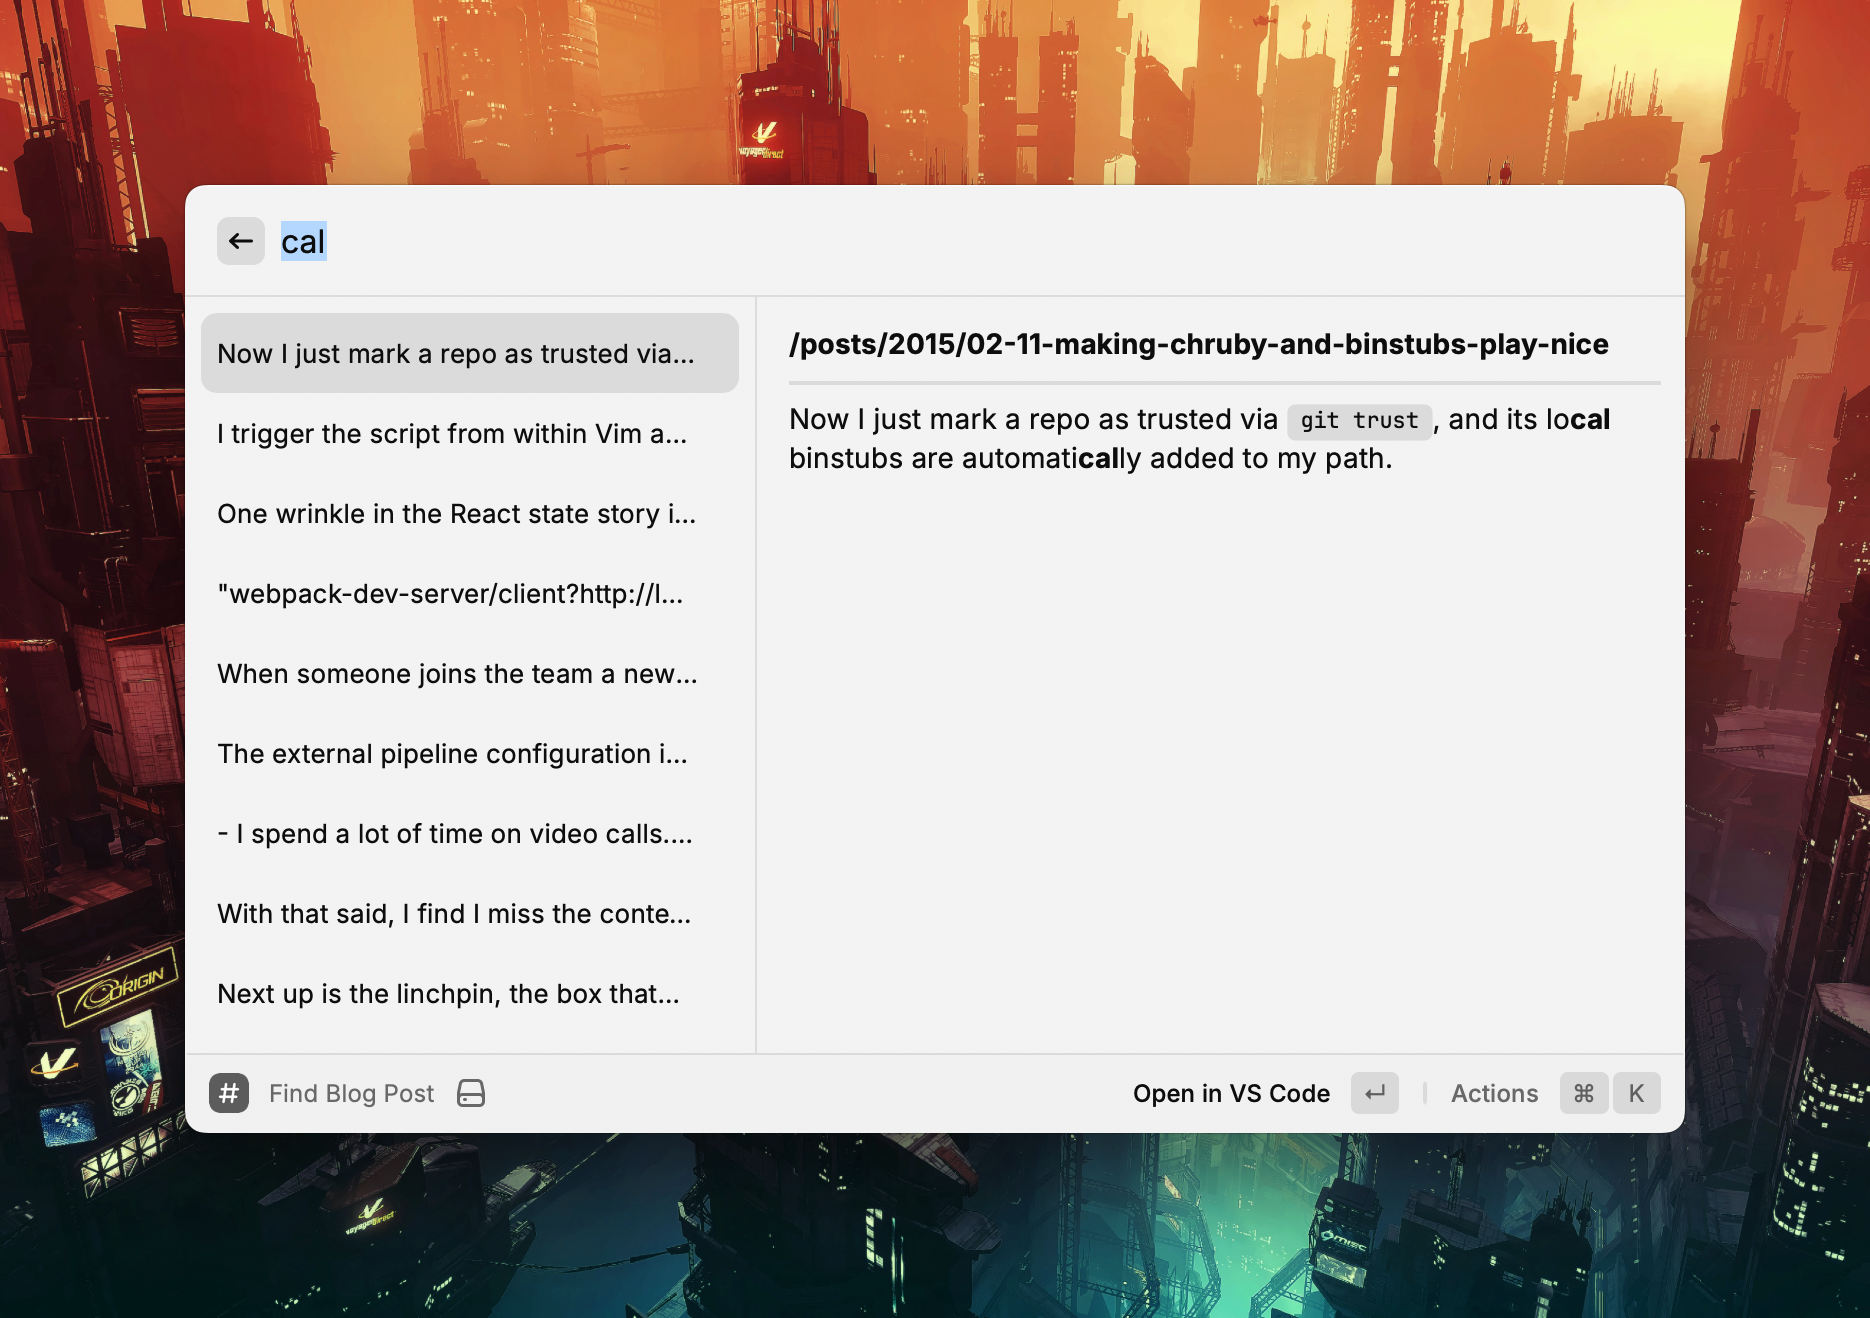
I’ve been looking for a way to search through the local copy of my blog using Raycast.
I ended up writing a custom extension to do it. ChatGPT helped grease the way—especially in rendering the results.
It uses a brute force grep over the files’ contents which works fine given the size of the repository.
The two main actions on the extension are opening the post in my editor and copying a Markdown link to the post1.
Here is a look at the Raycast command:
export default function Command() {
  const [query, setQuery] = useState<string>("");
  const [results, setResults] = useState<SearchResult[]>([]);

  useEffect(() => {
    if (query.trim() === "") {
      setResults([]);
      return;
    }
    try {
      const posts = getAllPosts(BASE_PATH, BLOG_SUBDIRS);
      const matches = searchPosts(posts, query);
      setResults(matches);
    } catch (err) {
      console.error("Error reading blog posts:", err);
    }
  }, [query]);

  return (
    <List onSearchTextChange={setQuery} throttle isShowingDetail>
      {results.map(({ file, snippet }) => {
        const filename = path.basename(file);
        const relativePath = path.relative(BASE_PATH, file).replace(/\\/g, "/");

        // Convert to URL relative from site root based upon Hugo URL config
        const relativeUrl = `/${relativePath.replace(/\.md$/, "").replace(/\/\d\d\d\d-/, "/")}`;

        // Grab the title from the front matter
        const fileContent = fs.readFileSync(file, "utf8");
        const titleMatch = fileContent.match(/^title:\s*(.*)$/m);
        const title = titleMatch ? titleMatch[1].replace(/^['"]|['"]$/g, "") : filename;
        const markdownLink = `[${title}](${relativeUrl})`;

        return (
          <List.Item
            key={file}
            title={snippet.replace(/\*\*/g, "")}
            detail={<List.Item.Detail markdown={`**${relativeUrl}**\n\n---\n\n${snippet}`} />}
            actions={
              <ActionPanel>
                <Action.Open title="Open in VS Code" target={file} application="/Applications/Visual Studio Code.app" />
                <Action.CopyToClipboard title="Copy Markdown Link" content={markdownLink} />
              </ActionPanel>
            }
          />
        );
      })}
    </List>
  );
}
And here is the full file.
Which is handy when cross linking while writing other posts. ↩︎
A replication focused storage engine.
Simon Willison:
Using LLMs to write code is difficult and unintuitive. It takes significant effort to figure out the sharp and soft edges of using them in this way, and there’s precious little guidance to help people figure out how best to apply them.
If someone tells you that coding with LLMs is easy they are (probably unintentionally) misleading you. They may well have stumbled on to patterns that work, but those patterns do not come naturally to everyone.
I’ve been getting great results out of LLMs for code for over two years now. Here’s my attempt at transferring some of that experience and intuition to you.
Some nice tips in this.
Time for another rundown post. Here are a bunch of macOS apps I use. You’ll see some entries from my previous iOS apps post mentioned.
DayOne - Where I journal.
NotePlan - My knowledge base for work. It uses plain Markdown files and has calendar-based notes which suit my workflow. I’ve used it for task management too, but don’t anymore. It’s just a searchable knowledge base of work notes and references for me.
Alfred - My quick launcher for apps and custom workflows I’ve collected and written. My workflow collection warrants a separate post.
Things - Where I track everything I want to do at work and at home. Syncs to my phone which is essential.
Bear - My note taking and personal knowledge base. I keep work specific notes in NotePlan rather than here.
MindNode - A clean mind mapping tool. Sometimes I find the spacial nature of mindmapping helps me structure my thoughts.
Fantastical - A calendar that shows my iCloud and Google calendars together. It’s getting a bit pricey for what I use it for so it may not make it past its next subscription cycle renewal.
MimeStream - A native GMail client. Goes good.
Bike - I swear the only reason I use this outliner is because of its delightful animations. I wish this UI was embedded in NotePlan.
Ulysses - Good for long form writing. I do less and less of this so am struggling to justify the subscription cost.
Monodraw - I love ASCII art.
Safari and Chrome - I use Chrome for work as it enables a bunch of features in the Google Suite. I to keep my personal browsing separate so I use use Safari for that. I use Choosy on my work machine to route common sites accordingly. I don’t use Chrome at all on my personal laptop. I gave Arc a crack for a while instead of Safari, it was kinda cool but ultimately not worth the battery drain.
1Blocker - Ad blocker for Safari.
StopTheMadness - Deal with a bunch of annoying stuff on the web.
Kagi Search - Supporting the little guy.
Supercopy - Provides a hot key to copy links (I loved this on Arc).
Instapaper - My read later service of choice.
Spotify - This cops a hiding.
Apple Music - I still have a bunch of my music in Apple Music (via iTunes Match) so I sometimes play music here. I use NepTunes to scrobble from Apple Music to Last.fm.
MusicBox - I save albums in here to listen to later.
VLC - O.G. video player.
Play - I save online videos in here to watch later. The Apple TV and iPad companion apps are killer.
DarkNoise - A white noise app. Goes great with over ear headphones.
Unread - Viva la RSS.
Ivory - For trawling Mastodon.
iTerm - Still a solid terminal, though Warp looks like a fresh approach.
VSCode - I didn’t see a Chromium tool winning but here we are. I like the vibes of Zed but dev containers keep me on VSCode.
NeoVim - This old Vim guy still throws up some motions in a terminal from time to time.
OrbStack - A nice way to run Docker containers.
Postico - A solid Postgres client.
Fork - I mostly use this Git client to stage partial lines and, increasingly, to rebase commits.
Lightroom Classic - This is where I manage and process the majority of my photos.
Photoshop - For those times you need finer grained processing.
Topaz Photo AI - Mostly used for upscaling old photos and noise reduction. With that said, the noise reduction that’s been added to Lightroom is pretty good so I might retire this sucker.
1Password - My password and secrets manager.
Moom - Adds a bit of window management for when I’m using an external monitor.
Karabiner Elements - Lets me customise my keyboard and mouse.
Apple Shortcuts - Handy for automation and gluing things together. Pairs well with Alfred.
ExpressVPN - 🕵️♂️
Soulver - Notes and calculations in one spot.
CleanShot X - Slick screenshots.

I love finding out about what apps other folks use so I thought I’d give a rundown on what’s on my iPhone.
Zenitizer - A meditation timer that can play some white noise and throw up chimes on a custom interval. Most of the other meditation apps are junky or have a bunch of courses in them and cost a bunch more.
MacroFactor - A calorie tracker app that has a nicer UX than MyFitnessPal. Remember kids, you can’t outrun your mouth.
Hevy - Fairly simple way to track strength workouts. The Apple Watch companion app is solid.
Fitbod - I’m not using it at the moment, but if you want an app to suggest workouts based upon equipment you have to hand that has good Apple Watch integration, this is great.
Darkroom - I like how this edits photos in place non-destructively. There’s decent variety in its preset community. Lightroom has better masking and noise reduction options which is sometimes helpful.
Retouch - When I want to spot remove blemishes, this app does a bang up job.
Halide - Manual shooting controls, and now with Process Zero, less processed raw images.
Google Photos - I use this mostly as a second photo library backup (after Apple Photos). The search is better than Apple photos (duh) and the geographic heatmap view is fun.
Leica and Fuji apps - Mostly used for pairing with my cameras so I can tag GPS coordinates as I shoot.
Lumy - A nice, sanely priced, golden hour tracker.
Kino - Doofus-proof colour grading and anti shake are baked into this video camera.
Instapaper - The O.G. read-it-later app for me. It’s still where I read and highlight the most.
Unread - My RSS feed reader. I use Feedbin as a backend. I use Unread to scan through my RSS feeds and triage articles I want to read. The ones I like, I send to Instapaper.
Kindle and Audible - I read or listen to most of my books here. Though, now that Spotify premium offers 15 hours a month of audiobook listening, I’m using that more. With that said, the Audible interface is way better.
O’Reilly - I have an O’Reilly subscription through work so I read some technical work on here.
Readwise - I’m on a grandfathered plan from the beta. I pump my Kindle and Instapaper highlights into this. The daily review feature in this app is like having flashcards for them.
The Economist - I read the “World in brief” most days to catch up on what’s happening around the traps.
StoryGraph - I’m trying this to track the books I want to read. It’s a bit clunky but does the job.
Spotify - My music subscription service of choice. I kick off most work weeks with my “Discover Weekly” playlist. Spotify’s recommendations continue to throw up things I haven’t heard before that I like.
Marvis - I still have a bunch of music uploaded to Apple Music via iTunes Match. Marvis is a nice player for my Apple Music library. It includes Last.fm scrobbling and lyrics viewing which is handy.
Overcast - My podcasting app of choice for years now. The Smart Speed feature is still killer.
MusicBox - I track albums I want to listen to in here.
Dark Noise - A white noise app for those times I need to lock into some work. Headphones on and fire up one of the mixes I’ve made.
Things - Where I track everything I want to do at work and at home. Syncs to my Mac and iPad which is essential.
Bear - My note taking and personal knowledge base. The UI is slick and the search and tagging works.
Gmail - I use Gmail for work and personal email so the standard app from Google makes sense.
Google Calendar - Somehow this is the best calendar app I’ve found. It handles iCloud calendars and Google calendars (for work) in one place well.
Day One - I’ve been journaling in this for something like 13 years. I love it. The “On this day” view surfaces up something interesting most days.
Mela - A nicely designed app for saving recipes.
1Password - I still use this for passwords and secrets for work and the family.
SwiftScan - It’s getting a bit pushy with upgrading but this base version still works a treat when it comes to scanning receipts or documents.
Soulver - In the venn diagram between a calculator and a spreadsheet.
Apple Photos - I export at least a JPG of all my photos here. The photo widget and Apple TV screensaver reliably bring me joy with the photos they surface.
Camera - This is the camera I use the most.
Apple Maps - The maps have gotten good and I prefer its turn-by-turn guidance over Google Maps.
Fitness and Health - I track all my workouts, activity, and sleep in here. Absolutes can be off but the trends are good to pay attention to.
Shortcuts - This hits me in the soft futzing centres of my soul. I enjoy gluing stuff together and making accessing apps easier.
Privacy concerns aside, this has me intrigued.
I’m a sicko for trawling the internet and loading up Instapaper with things to read later.
Which means, you’ll be shocked to hear, my reading queue can get large and unmanageble.
Longer articles tend to stay in the queue unread for quite a while.
Often, as with my productivity system, I’ll declare read later bankruptcy, archive a bunch of the stale articles, and walk away a little disappointed in myself.
Kagi’s Universal Summariser to the rescue!
Now, when I scroll through my queue and see those intransient “40 minutes to read” articles, I put their URL into the Kagi summariser.
If the concise summary it provides piques my interest I’ll ask for the key moments summary.
Then…I’ll usually still archive it. But! I feel a little better about life. 😎
One of my favourite features of Artifact is the ability to use machine learning to replace clickbait titles.
It’s good that you can trigger it from the listing page so that you can choose whether it’s worth reading an article or not.
It’s great that if enough people report the same article, a human reviewer may decide to make it the default title for all Artifact users.
It’s a very helpful feature for internet trawlers such as myself.
Ryan emphasizes the effectiveness of the copy-paste method in rapidly exploring alternate options.
He also mentions some shaping and analysis tools including Interrelationship diagrams and Jobs To Be Done (JTBD) Four Forces Diagrams.
A key point that struck a chord with me was his perspective on multiplayer tools like Miro. These tools are primarily valuable during simultaneous brainstorming processes like retrospectives.
Actual shaping typically involves a collective thought process, with a single individual transcribing the outcomes. This concept holds true even when using traditional methods like a whiteboard.
I spend too much time reading online.
I tend to trawl content from a variety of sources, save the shiny ones in Instapaper, and read them later.
The majority of the articles I read are sourced from RSS feeds in Feedbin. I’ve organized these feeds into three categories: ‘full read’, ‘skimmable’, and ‘skippable’. This system means that if I ever feel overwhelmed by the volume of content, I can quickly mark a large number of articles as read and move on with life.
I like to complement these feeds with articles from elsewhere. I used to route specific Twitter accounts into Feedbin for this but that option is gone since the Twitter API ‘asplosion1.
Around the same time as that feature disappeared I started using Artifact. It’s from the founders of Instagram and the early development cycle has been impressive. At its core is a machine curated personalised news feed2. The recommendation engine feels like it still has room for improvement, I’d love to be presented with more “surprising” articles, but it still manages to throw the odd interesting articles into the mix. Using it feels like panning for gold.
The latest version of Photoshop Beta now includes a feature called generative fill.
I can imagine it’s easy to compromise the authenticity in your photography if you overuse these kinds of tools. With that said, and I know it’s potentially a slippery slide, there are situations where they can be incredibly useful.
For instance, I sometimes want to adjust a crop and need to fill in some areas to maintain the balance of the composition, and my Photoshop pixel-surfing chops aren’t up to the task.
I had a crack at using generative fill on a photo I recently took that I wished had more foreground.


The results look usable.
I also tried a prompt that removed the shadow on the left but the results of that were less natural.
Experimenting with various prompts and browsing their outcomes is far more enjoyable than swearing at the healing and clone brush tools 😂.
The ChatGPT model is huge, but it’s not huge enough to retain every exact fact it’s encountered in its training set.
It can produce a convincing answer to anything, but that doesn’t mean it’s reflecting actual facts in its answers. You always have to stay skeptical and fact check what it tells you.
…
I like to think of language models like ChatGPT as a calculator for words.
This is reflected in their name: a “language model” implies that they are tools for working with language. That’s what they’ve been trained to do, and it’s language manipulation where they truly excel.
The post includes a list of language manipulations you can try.
I might start working through my Instapaper queue in the car now that it supports CarPlay.
Editing titles on posts on mobile is something I’ve wanted for ages too, so that’s a win.
I’ve journaled in various forms over the years 1.
About ten years ago, I migrated my journaling to the Day One app.
I love how Day One is available on my Mac and my iPhone. I post text, photos, audio, links, or quotes as they pop into my head. I tag posts and even store posts into separately themed journals.

In the last six months, I’ve added reviewing my journal to my morning ritual.
Each morning, before I knock out the day’s Wordle, I review the posts “on this day” in Day One.
It’s been a delight.
On some days, I have posts dating back ten years. It’s like jumping into a time machine to a previous life. Reading back over challenges at work, holidays we’ve taken, or photos of my family always brings a smile to my dial.
Once a month, I choose a random tag and review the journal posts under that. It’s illuminating to see the evolution of my mood or feelings on a particular topic over time.
Regularly reviewing my posts has made writing posts feel more valuable too.
So yeah, journaling is like a tricked-out DeLorean.
A site that provides a peek at which apps folks have in their docks.
This charger is great for travelling. It can power my laptop and charge my phone and watch or headphones at the same time.
A tool from Hashicorp for adding document review and collaboration workflows over Google Docs.
A long list of gems and tools.
I’m still a sucker for code editors.
An inspection of how values affect software through the lens of text editors.
I’ve got a hankering for keyboard shortcuts.
I’m all about pressing a key without having to worry about which application I’m in and my computer doing something useful.
This noble pursuit has taught me one thing: there’s never enough keys™.
Good old Vim has demonstrated the value of a trusty leader key in the war to get more keys. So, I undertook a holy mission to find the mythical macOS hyper key, and along the way found the deep well of keyboard customisation that is Karabiner-Elements.
I’ve set up Karabiner-Elements so that if I combine the backslash key with other keys, it acts as the hyper key 1.
I use this hyper key as a prefix to bind global shortcuts without having to crush my fingers, and soul, into a ball.
Here’s a selection of the shortcuts I keep behind this hyper key prefix:
\+t brings my time tracking app into focus.\+s locks my screen.macOS doesn’t natively recognise the extra buttons on my new mouse which sucks because: there’s never enough keys™.
So, I was chuffed to find that Karabiner recognises these extra mouse buttons and can bind them to key sequences.
Here’s a look at my bindings:

I miss the sideways scrolling of the Magic Mouse, but I’ve set up Karabiner so that if I hold down my scroll wheel button, I can scroll left and right. It works reasonably well and means I don’t need to reach for shift while spinning the scroll wheel to side-scroll.
I map button 4 of my mouse to play and pause my music. The media keys on my keyboard are a chord away, but usually, it’s easier to press a single button instead.
I map button 5 to a shortcut2 assigned to the Meet Mute Chrome extension. This shortcut toggles mute on my current running Google Meet meeting, which is killer.
So there you go. Maybe you’ll find something useful in my Karabiner-Elements config file that you can steal.
And may you never run out of keys.
I rebuilt A Strange Kind of Madness using Hugo a month or so ago. As with most photoblogs, it has pages with many images on them, and I was inspired by Photo Stream to load these images lazily.
If you want Hugo to resize images when it builds a site, you need to place your images alongside posts, so they are considered page resources. So, I put each post in a folder with its associated image and reference it in a field called, shockingly, image in the post front matter.
$ ls content/posts/2020-03-31-my-post
20200331-4491.jpg
index.md

$ cat content/posts/2020-03-31-my-post/index.md
+++
title = My Post
date = 2020-03-31T10:42:00+08:00
image = 20200331-4491.jpg
+++
Roll-up pages have many thumbnails and benefit most from lazy loading.
First up, add the lazyload javascript library to your site build.
import Lazyload from "lazyload";

// Fire up our lazyloading (just initialising it does the job)
const _lazyload = new Lazyload();
The library’s default configuration targets images with the lazyload class and loads the image stored in the data-src attribute. If you place an image on the standard src attribute, it will be treated as a placeholder.
I wanted something more interesting than a sea of grey rectangles for placeholder images. I had a look at using BlurHash, but that was going to involve rendering canvas elements for placeholders 1.
I want the front end to be as simple as possible 2, so I abandoned that approach and instead created a single-pixel resize of the source image which provides a simplistic average colour placeholder for each image. It does the trick.

All of the necessary resizing code and markup is in a Hugo partial that renders a thumbnail for each post. Be sure that your image tags include width and height attributes so the browser lays them out correctly such that lazy loading is effective.
{{- with .Resources.GetMatch (.Params.image) -}} {{/* Resize to a single pixel
for a placeholder image */}} {{- $placeholder := .Resize "1x1" -}} {{/* Resize
to 800 pixels wide for a thumbnail image */}} {{- $thumbnail := .Resize "800x"
-}}
<img
  src="{{ $placeholder.RelPermalink }}"
  data-src="{{ $thumbnail.RelPermalink }}"
  width="{{ $thumbnail.Width }}"
  height="{{ $thumbnail.Height }}"
  class="lazyload"
/>
{{- end -}}
The main downside to this is that two resizes for each image adds a bunch of time to the site’s build process but that’s a trade off I’m willing to make.
Go forth, and embrace laziness.
Or integrating React components that handle this for you. ↩︎
The only Javascript it uses is for this lazy loading. ↩︎
I’ve been working from home full time for four years, and my desk setup has mostly remained the same during that time. But the recent spate of folks sharing their home office setups—this Basecamp post was my favourite—inspired me to spruce up my own.
So, now it’s tour time folks!

My work laptop (1) is a 13 inch 2017 MacBook Pro. It’s got the busted keyboard design. I mostly use an external keyboard, so mine still works fine 🤞.
My monitor (2) is a 27 inch Dell that’s six years old. It does the job. I’ll probably wait until it dies before I replace it.
I use a Kinesis Advantage 2 keyboard (3) which lets me hold my hands like a T-Rex while I type. It’s easy on the wrists but beware, it took me six months to type on this thing properly, and those six months were tough going so perhaps not a fun challenge to take up during already potentially stressful quarantine times.
I replaced my trusty stack of too-dry-to-read textbooks with the brutalist styles of this monitor stand by Brateck (4). It has a drawer where I can store my notebook and pens when I’m not using them. But what tickles the organiser in me the most is the cavity beneath it where I can store other things1.
Pictures and plants are, of course, essential (5 & 6).
I used an Apple Magic Mouse for years, but it started acting flaky after I upgraded to Catalina. So, I switched to a Razer Death Adder (7) which is way more comfortable to hold. It doesn’t allow me to side scroll as easily but not recharging batteries regularly is nice. Also, it has disco lights and a USB cable. Actually, let’s talk about cables and wires for a minute.
So, wires. Yeah, they get in the way. Yeah, they can look ugly. But you know what else they are? Reliable. That’s right, like a blue heeler at dusk, they’re always there for you. They mean there’s no more stuttering when you move your mouse. You don’t need to worry about Wi-Fi turbulence when you’ve got an old fashioned Cat 6 cable plugged in baby 2. With that off my chest, let’s get back to the tour.
Next up is the linchpin, the box that brings it all together. A couple of my colleagues recommended the CalDigit TS3 Plus Thunderbolt dock (9) and it’s tops. I plug everything into it, USB devices, my router, my display, my microphone and headset—and it all flows to my laptop via a single Thunderbolt cable (8). The TS3 Plus also serves as a power source for my MacBook so I can leave my power cord in my bag for that wondrous time, someday in the future when I can work outside again.
I spend a large portion of my day on video calls so a reliable audio setup is essential. I have a Jabra headset which is light and comfortable, but I also have an old set of Sennheisers (10) that I enjoy listening to music through. Again, some colleagues tipped me off to the fact that I can frankenstein a microphone onto any headset by using an Antlion ModMic. Its hardware mute button isn’t as low down on the cord as I like, but at least it’s there.

Another bonus of wearing this new set up is that I look like a helicopter pilot instead of a call centre worker and who doesn’t want to look like a helicopter pilot, right?
I run my headphones into a Magni 2U headphone amp (11) and plug that and the microphone directly into the TS3 Plus 3. So now, I have my favourite headphones handy when I need to concentrate and want to listen to something from one of my go to playlists (or White Noise).
When I want to listen to music without headphones, I stream it through my fairly ancient Jambox (12). It’s rugged and still trucking though I expect the battery to self combust any day now.
I've ordered a pair of Audioengine HD3 speakers to replace it because my ears deserve it.
Update: (2022-05-22) There weren’t any HD3’s in stock so I instead went with a pair of Edifier R1280DB’s. They are cheaper, connect to the TS3 via digital optical cable, sound good, and look alright.

I’ve also ordered a Logitech C925E webcam which I’ll mount on my monitor so I’m not always side-eyeing folks from my laptop camera in meetings.
I spent a scandalous amount of money on a Herman Miller Embody (13) when I first set up my home office. I never worry about my chair, so I think I can say that money was worth it 🤷♂️.
Finally, there’s my desk (14). It is a standing desk that I put together eight years ago. Back then, it was tricky to find standing desks online, so to save money, I only ordered legs from GeekDesk 4 and attached a bamboo tabletop from Ikea to them. The top could be a bit larger, but maybe I’m just greedy.
Update: (2023-05-14) The motor on my GeekDesk died after ten years so I replaced it with an 1800mm wide Zen Pro Bamboo Sit Stand Desk. The extra width is much appreciated and the preset heights work a treat.
So, there it is—the throne of my weekday castle.
There are a window and couch out of shot to the left. The couch is mostly ornamental because if I allow myself to lie down on it and close my eyes for just one minute, all will be lost.
I guess I could have hollowed out the middle of those old textbooks 🤔. ↩︎
You should try to use an Ethernet cable at least. It can make your video calls more reliable. ↩︎
I used an Antlion USB adapter for this but found it would end up with static when my laptop woke from sleep, so now I plug in directly, and things seem fine. ↩︎
I ordered the v2 legs at the time and shipped them to Perth from the US for a sum that would make a Nigerian prince blush. ↩︎
I use LucidChart for collaborative drawing at work but I’m going to give Excalidraw a crack over the next few weeks.
I still like listening to albums and sometimes want Spotify to play a random album from a playlist of albums I’ve created.
I couldn’t find anything out there that does this so I wrote myself a script to handle it instead.
Here’s a rundown if you want to use it.
First up, you’ll need a playlist with at least one track from each of the albums you want to choose from (here’s mine). Grab the ID of your playlist1, and your username and add them into the script below.
Then, you’ll need to create an app in Spotify and get your client ID and secret, add them to the script below, so you can authorise the script.
Finally, run gem install rspotify in your default ruby2 and you should be off to the races.
Run the script with Spotify desktop app installed and it’ll open up a random album for you to press that sweet, sweet play button on ⏯.
I run the script from an Alfred workflow so I’ve got it close at hand.
Enjoy 🎷🎶
#!/usr/bin/env ruby
#/ Usage: open-random-album
#/ Open a random album in Spotify.
#/

require "rspotify"

class RandomAlbum
  CLIENT_ID = "YOUR CLIENT ID"
  CLIENT_SECRET = "YOUR CLIENT SECRET"
  USERNAME = "YOUR USERNAME"
  PLAYLIST_ID = "YOUR PLAYLIST'S ID"

  def self.fetch
    RSpotify.authenticate(CLIENT_ID, CLIENT_SECRET)
    new.fetch
  end

  # Grab the albums from a playlist and choose one at random
  def fetch
    playlist = RSpotify::Playlist.find(USERNAME, PLAYLIST_ID)
    albums_in_playlist(playlist).sample
  end

  private

  def tracks_in_playlist(playlist)
    limit = 100
    offset = 0

    [].tap do |result|
      loop do
        tracks = playlist.tracks(limit: limit, offset: offset)

        break if tracks.empty?

        result.concat(tracks)
        offset += limit
      end
    end
  end

  def albums_in_playlist(playlist)
    tracks = tracks_in_playlist(playlist)
    tracks.reduce({}) do |acc, track|
      acc[track.album.id] = track.album
      acc
    end.values
  end
end

album = RandomAlbum.fetch

puts "Opening '#{album.name}' in Spotify"
system "open #{album.uri}"
There are a handful of web pages that I use regularly throughout the day. Some are web apps that I keep pinned in Chrome while others come and go as I work.
I tend to close tabs when I’m done with them but I still end up with many open tabs. I’ve created an Alfred Workflow that opens a page I’m looking for so I don’t have to pick through my Chrome tabs by hand to find it.
The Find Page workflow takes a URL from a predefined list, runs an AppleScript that finds and activates the associated page if it’s already open in Chrome, otherwise it opens it in a new tab.
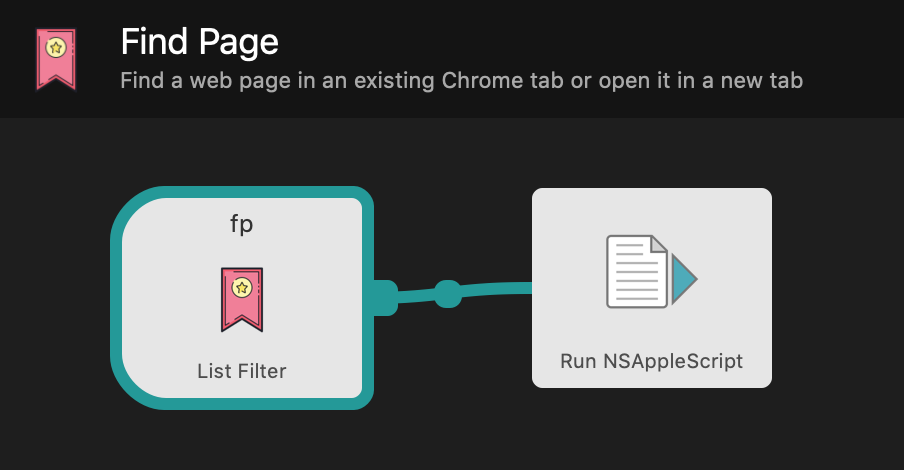

You can download the workflow and try it yourself.
I recently moved the hosting of my various blogs and websites off my own server to Netlify.
I was originally going to set up an S3 bucket and Cloudfront distribution for each of my sites but Netlify provides me the CDN and hosting features I need all bundled up already. You can upload files directly for serving or hook your site up to run a static site generator when you push to a branch of a Github repository.
In short, I’m not longer paying hosting costs and they handle all of the SSL certificate renewal from Let’s Encrypt for me.
Next up I plan to clean up the tooling I use for some of my sites and tweak things on here so I have more variety in my posts.
Clever.
A simple application to get your macOS menu bar under control.
Some handy tips in here.
Just use this to format any Javascript you write.
ASCII art editor for macOS. Great for adding diagrams alongside code.
The default template for an Atom feed in Middleman Blog uses the last modified time of an article’s source file as the article’s last update time. This means that if I build the site on two different machines I will get different last updated times on articles in the two atom feeds. I’d rather the built site look the same regardless of where I build it.
The source code for the site lives in a Git repository which means I have a consistent source for update times that I can rely on. So, I’ve added a helper that asks Git for the last commit time of a file and falls back to its last modified time if the file isn’t currently tracked in Git.
helpers do
 def last_update_time(file)
    Time.parse `git log -1 --format=%cd #{file} 2>/dev/null`
  rescue
    File.mtime(file)
  end
do
I now use this helper in my Atom template for each article.
xml.entry do
  xml.published article.date.to_time.iso8601
  xml.updated last_update_time(article.source_file).iso8601
  xml.content article.body, "type" => "html"
end
Allows you to spoof your mac address. Useful for airports.
SVG Minifier web app.
A tool that combines traceroute and ping.
Graphviz is handy for generating diagrams from code.
A nice post on setting up decent keybindings in Emacs.
Grep all the things.
Zsh does so much.
Nice tour of Unix and zsh.
The versioned, forkable, syncable database
Take it. It’s yours.
curl wrapper that uses chrome cookies.
Add placeholder image colours to images.
If you use PostgreSQL this is a nice native Mac OSX client.
Agile Tortoise:
Terminology for iOS is based on WordNet, a great semantic lexical reference. We do not offer a full Mac app for Terminology, but have prepared a dictionary using this same great data for use in the built-in OS X Dictionary app.
I use Vim as my text editor and ctags for source code navigation.
I’ve found ctag’s default javascript tagging to be lacking so I’ve added the
following to
my ctags config file
to handle some of the newer ES6 ES2015 syntax such as classes1.
Note that the listing below contains comments which ctags config files don’t support. You can find the actual file on Github.
--languages=-javascript
--langdef=js
--langmap=js:.js
--langmap=js:+.jsx

//
// Constants
//

// A constant: AAA0_123 = { or AAA0_123: {
--regex-js=/[ \t.]([A-Z][A-Z0-9._$]+)[ \t]*[=:][ \t]*([0-9"'\[\{]|null)/\1/n,constant/

//
// Properties
//

// .name = {
--regex-js=/\.([A-Za-z0-9._$]+)[ \t]*=[ \t]*\{/\1/o,object/

// "name": {
--regex-js=/['"]*([A-Za-z0-9_$]+)['"]*[ \t]*:[ \t]*\{/\1/o,object/

// parent["name"] = {
--regex-js=/([A-Za-z0-9._$]+)\[["']([A-Za-z0-9_$]+)["']\][ \t]*=[ \t]*\{/\1\.\2/o,object/

//
// Classes
//

// name = (function()
--regex-js=/([A-Za-z0-9._$]+)[ \t]*=[ \t]*\(function\(\)/\1/c,class/

// "name": (function()
--regex-js=/['"]*([A-Za-z0-9_$]+)['"]*:[ \t]*\(function\(\)/\1/c,class/

// class ClassName
--regex-js=/class[ \t]+([A-Za-z0-9._$]+)[ \t]*/\1/c,class/

// ClassName = React.createClass
--regex-js=/([A-Za-z$][A-Za-z0-9_$()]+)[ \t]*=[ \t]*[Rr]eact.createClass[ \t]*\(/\1/c,class/

// Capitalised object: Name = whatever({
--regex-js=/([A-Z][A-Za-z0-9_$]+)[ \t]*=[ \t]*[A-Za-z0-9_$]*[ \t]*[{(]/\1/c,class/

// Capitalised object: Name: whatever({
--regex-js=/([A-Z][A-Za-z0-9_$]+)[ \t]*:[ \t]*[A-Za-z0-9_$]*[ \t]*[{(]/\1/c,class/

//
// Functions
//

// name = function(
--regex-js=/([A-Za-z$][A-Za-z0-9_$]+)[ \t]*=[ \t]*function[ \t]*\(/\1/f,function/

//
// Methods
//

// Class method or function (this matches too many things which I filter out separtely)
// name() {
--regex-js=/(function)*[ \t]*([A-Za-z$_][A-Za-z0-9_$]+)[ \t]*\([^)]*\)[ \t]*\{/\2/f,function/

// "name": function(
--regex-js=/['"]*([A-Za-z$][A-Za-z0-9_$]+)['"]*:[ \t]*function[ \t]*\(/\1/m,method/

// parent["name"] = function(
--regex-js=/([A-Za-z0-9_$]+)\[["']([A-Za-z0-9_$]+)["']\][ \t]*=[ \t]*function[ \t]*\(/\2/m,method/
Some of these matchers are too eager but a lack of negative look behinds in the regex engine ctags uses makes that a pain to avoid. Instead I have a script which executes ctags and then filters obviously useless tags from the tag file afterwards.
#!/usr/bin/env bash

set -e

# ctags doesn't handle negative look behinds so instead this script
# strips false positives out of a tags file.

ctags "$@"

FILE="tags"

while [[ $# > 1 ]]
do
key="$1"

case $key in
    -f)
    FILE="$2"
    shift
    ;;
esac
shift
done

# Filter out false matches from class method regex
sed -i '' -E '/^(if|switch|function|module\.exports|it|describe)	.+language:js$/d' $FILE

# Filter out false matches from object definition regex
sed -i '' -E '/var[ 	]+[a-zA-Z0-9_$]+[ 	]+=[ 	]+require\(.+language:js$/d' $FILE
I trigger the script from within Vim automatically using a plugin I wrote called tagman.vim.
The more Google pushes the sophistication of its web development tooling, the more we all benefit.
Like a gentleman I use chruby and Bundler to manage Ruby versions and gems in my projects.
Instead of typing bundle exec to run gem executables within a project, I prefer saving keystrokes and using an executable’s name on its own1. I also want to avoid installing another tool like Gem home.
So off to binstubs land I go. Bundler generates them for you and these days Rails even ships with a few as standard. These stub files live in your project and ensure the right set of gems for your project are loaded when they’re executed.
Security risks aside I could just prepend my path with ./bin: and walk away—except that chruby auto-switching spoils the party. When I enter a project directory with a .ruby-version file, chruby prepends the current Ruby version paths at the beginning of PATH thereby matching before my previously prepended ./bin:.
Chruby recommends using rubygems-bundler but I don’t want to install another gem to get this to work. So I tweaked my zsh setup to use preexec_functions like chruby to patch my PATH. I add my function to preexec_functions after chruby loads so that my code patches the PATH after chruby does its work.
As for security I use the same scheme as Tim Pope. Add a git alias for marking a git repository as trusted and then only add a project’s bin directory to PATH if it is marked as such.
Now I just mark a repo as trusted via git trust, and its local binstubs are automatically added to my path.
Changes in my .zshenv:
# Remove the need for bundle exec ... or ./bin/...
# by adding ./bin to path if the current project is trusted

function set_local_bin_path() {
  # Replace any existing local bin paths with our new one
  export PATH="${1:-""}`echo "$PATH"|sed -e 's,[^:]*\.git/[^:]*bin:,,g'`"
}

function add_trusted_local_bin_to_path() {
  if [[ -d "$PWD/.git/safe" ]]; then
    # We're in a trusted project directory so update our local bin path
    set_local_bin_path "$PWD/.git/safe/../../bin:"
  fi
}

# Make sure add_trusted_local_bin_to_path runs after chruby so we
# prepend the default chruby gem paths
if [[ -n "$ZSH_VERSION" ]]; then
  if [[ ! "$preexec_functions" == *add_trusted_local_bin_to_path* ]]; then
    preexec_functions+=("add_trusted_local_bin_to_path")
  fi
fi
The git trust alias from my .gitconfig:
[alias]
  # Mark a repo as trusted
  trust = "!mkdir -p .git/safe"
Even though I’ve aliased bundle exec to be in my shell I still feel like an animal when I have to type it. ↩︎